Best Free Fire Sensitivity Settings: Complete Guide 2026
Adjusting your Free Fire sensitivity settings is crucial for winning matches. If repeated losses are starting to demotivate you, it may be time to tweak your settings. Fast movements and precise positioning play a major role in Battle Royale games, and inaccurate aiming is often caused by improper sensitivity. Finding the right Free Fire sensitivity settings can significantly enhance your gameplay—even small changes can lead to noticeable improvements.
Free Fire: 9th Anniversary
Best Free Fire Sensitivity Settings – Check All Details December 2025
Free Fire sensitivity settings vary depending on the type of device you use. Discover how sensitivity works and find the best settings tailored to your device here.
Adjusting your Free Fire sensitivity is crucial for winning matches. If repeated losses are starting to feel discouraging, it may be time to tweak your settings. Fast reactions, precise movement, and accurate positioning are essential in Battle Royale games, and improper sensitivity can make aiming much harder than it should be. The right Free Fire sensitivity settings can significantly enhance your gameplay—even small changes can lead to noticeable improvements.
In this guide, we’ll break down the best sensitivity settings for Free Fire. Keep in mind that ideal settings depend on your device’s performance. For example, a 4GB RAM phone may require different sensitivity values than a high-end device. Let’s find the perfect settings for your device and elevate your gameplay!
What Are Free Fire Sensitivity Settings And Why Is It Important?
Free Fire sensitivity settings control how fast you look around and aim. If the sensitivity is too high, your aim becomes unstable. If it’s too low, movements feel slow. So, finding the right balance is important for smooth gameplay.
With a suitable sensitivity, you can aim better. In fact, land more one-tap headshots, and react faster in fights. Since new weapons like the Trogon and updates to guns like the XM8 and MP40. When they came this year, the best sensitivity for headshots changed as well. For example, using lower Red Dot sensitivity (around 80–85) helps control fast-firing guns like the Trogon.
If you play on a 120Hz phone, aim assist works better, so you can even try slightly higher sensitivity for quicker movement.
Best Overall Sensitivity For Headshots (Mid-to-High-End Devices, 4GB+ RAM)
| Setting | Value | Use |
|---|---|---|
| General | 95–100 | Fast turning in fights |
| Red Dot | 90–95 | Quick aim in close combat |
| 2x Scope | 80–85 | Balanced for short-range aiming |
| 4x Scope | 70–75 | Steady aim for medium range |
| Sniper Scope | 50–60 | Accurate for long shots |
| Free Look | 70–80 | Smooth camera movement |
First Time User Sensitivity Settings (Low-End Devices, 2-4GB RAM)
If you are just getting settings, here are some settings which you can follow:
| Setting | Value | Use |
|---|---|---|
| General | 90–95 | Easier turns; good for learning 360s |
| Red Dot | 85–90 | Better drag aim with pistols/rifles |
| 2x Scope | 75–80 | Smooth aim for beginners |
| 4x Scope | 65–70 | Stops shaky aim on low-end devices |
| Sniper Scope | 45–55 | Helps steady sniping while prone |
| Free Look | 65–75 | Easy scanning in hot drop areas |
Best Sensitivity Settings For Aggressive Users (8GB+ RAM, Claw Grip)

Follow these settings to achieve a good claw grip and other advantages.
| Setting | Value | Use |
|---|---|---|
| General | 100 | Fast turns for clutches and third-party fights |
| Red Dot | 95 | Quick hip-fire headshots (MP40, etc.) |
| 2x Scope | 85 | Smooth aiming while driving/shooting |
| 4x Scope | 75 | Fast mid-range aim during fights |
| Sniper Scope | 55–65 | Quick-scoping enemies from range |
| Free Look | 80 | Fast teammate/location checks in fights |
Gyroscope-Enabled Settings (All Devices)
These Gyroscope enables settings work regardless of which device your are playin in.
| Setting | Value | Use |
|---|---|---|
| General | 90 | Works well with tilt for smoother movement |
| Red Dot | 85 | Helps gyro aim for super accurate shots |
| 2x Scope | 75 | Less thumb strain during long gyro sessions |
| 4x Scope | 65 | Better recoil control using device tilt |
| Sniper Scope | 50 | Precise gyro aiming for long-range snipes |
| Free Look | 70 | Easy head checks using gyro |
Also read: How to Download & Play Free Fire on PC?
How To Change The Settings?
If you are new to Garena Free Fire and don’t know about Free Fire sensitivity, we have the solution. If you want to get the best sensitivity for Free Fire one-tap headshot, just follow these simple steps:
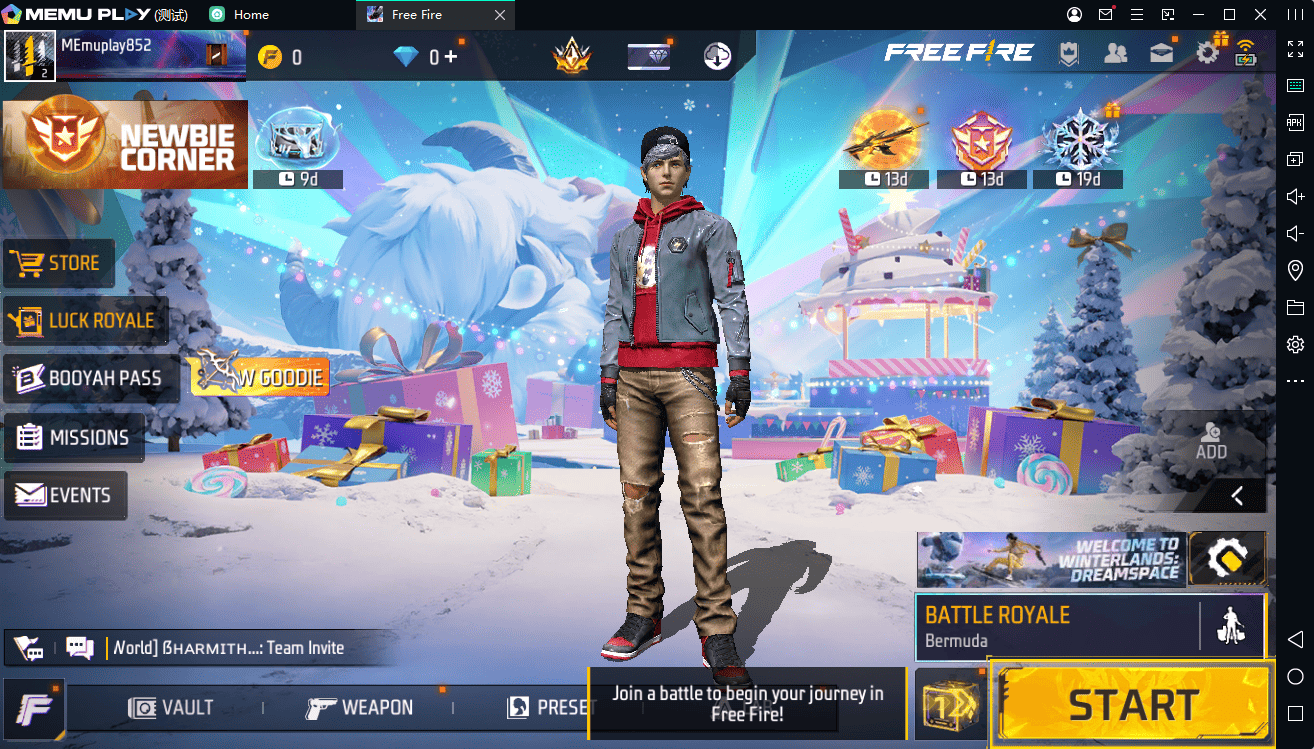
Step 1: Firstly, open Garena Free Fire on MEmu emulator.
Step 2: In the top right corner of your game lobby, you can see the Settings icon. Tap on this.
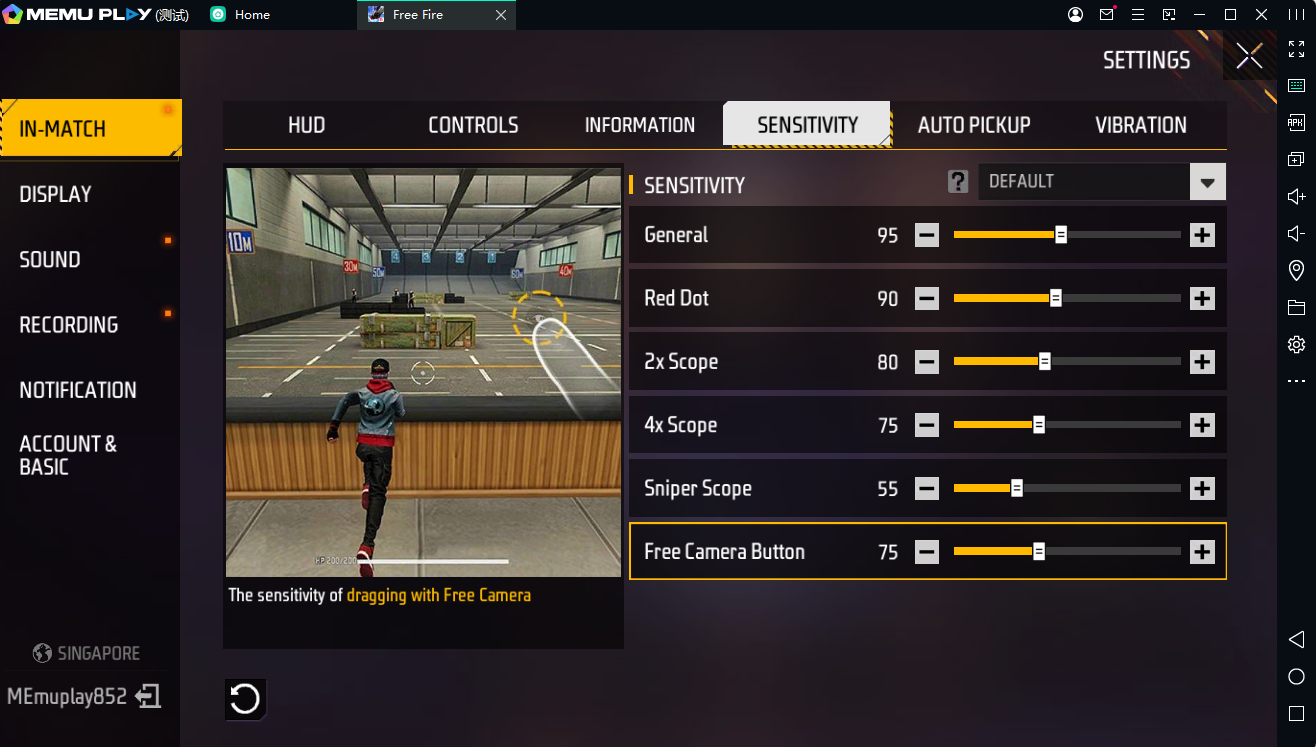
Step 3: Under the Settings section, you should be able to see a Sensitivity option. Click on this.
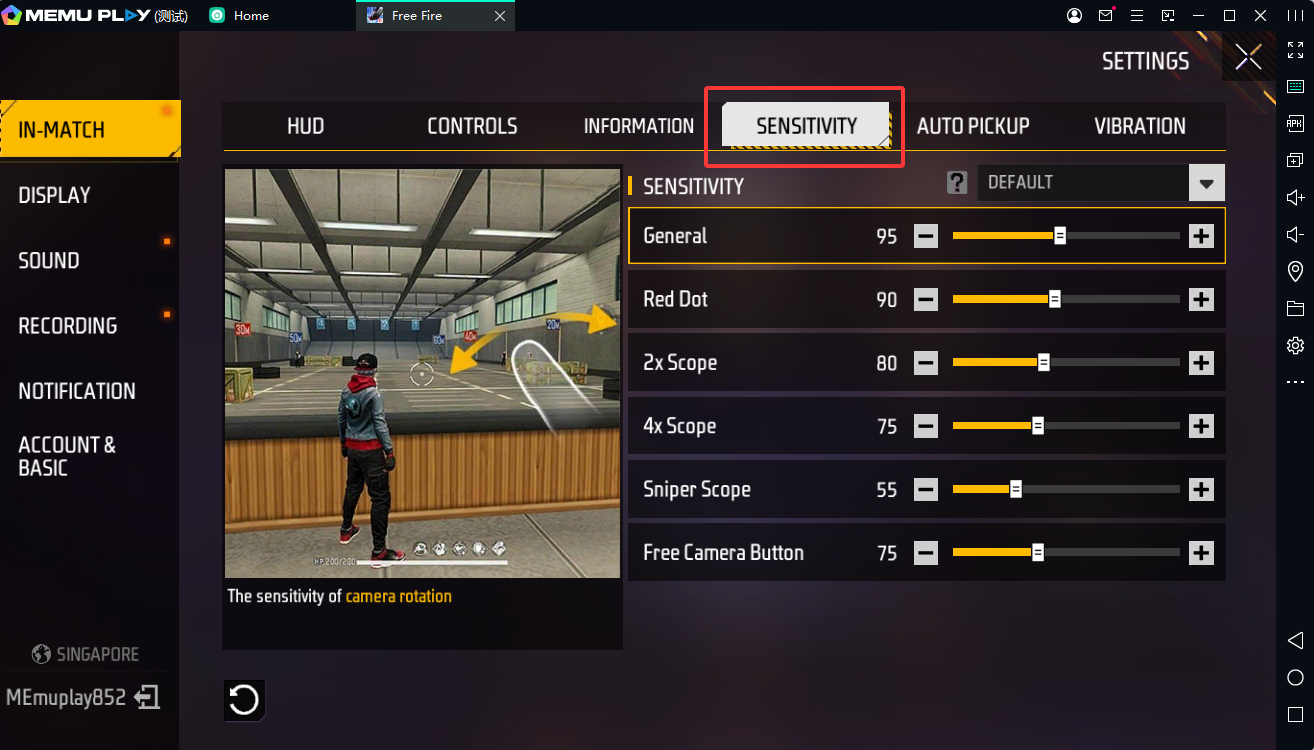
Step 4: You cannot see your default sensitivity settings. A number shall be assigned under the General, Red Dot, 2X Scope, 4X Scope, Sniper Scope, and Free Look sections.
Step 5: You need to change the values assigned under each section to the ones we provided. You can do so by adjusting the scroller beside each section.
Note: Change the number according to your device. (Low-end or high-end; refer to the previously mentioned best Free Fire Settings for 4GB RAM and more than 4GB RAM).
Step 6: Hop into a game or Training Mode to see if you are comfortable and can perform well with the new Free Fire sensitivity settings. If not, tweak the Free Fire headshot setting values here and there until you are comfortable.
How To Test And Personalise Your Sensitivity Settings?
Finding the perfect sensitivity is a process of trial and error. Here’s how to test and tweak your settings effectively:
- Use Training Mode: Start in Training Mode to test your settings without the pressure of a live match. Practice drag shots, recoil control, and quick turns with different weapons. Say using, MP40 for close-range, AWM for sniping.
- Play Clash Squad: This mode is ideal for testing close and mid-range combat. Adjust Red Dot and 2x Scope settings based on how well you track moving targets.
- Custom Rooms for Sniping: Create or join Custom Rooms to focus on sniper sensitivity. Test long-range shots with the AWM or Parafal. This way, you can ensure your Sniper Scope setting feels precise.
- Record and Review: Use your device’s screen recording feature to capture gameplay. Review your aim and movement to identify if your sensitivity feels too fast or sluggish.
- Tweak Incrementally: Adjust settings by 5 to 10 points at a time and play two to three matches to evaluate comfort. For example, if your aim overshoots, lower the General or Red Dot by 5 points. Keep a log of your settings and performance (e.g., headshot rate, kills per match) to track improvements. Join Free Fire communities on X to share your settings and get feedback from other players.
Best Free Fire Sensitivity Based On MEmu!
Different types of players on Free Fire have different approaches to the game. Hence, there is no one sure-shot setting that could work for all. You would need certain settings according to your play style to win as many matches as you potentially can. At any level, customise the Free Fire sensitivity settings to match to match up with your style.
Be it playing aggressively, defensively, or a mix of both, the best sensitivity for Free Fire one-tap headshot will help for sure.
- Sensitivity settings for Aggressive Players (Rushers): Quick reflexes and close-range fights. High camera and red dot help in instant headshots.
- Defensive Players (Support/Healers): Balanced control with minimal recoil. Settings are ideal for holding angles and long-range accuracy.
- Balanced Players (All-Rounders): A stable setup for both push and cover gameplay. Smooth transitions between scopes.
- Snipers / Distant Shooters: Lower sensitivity ensures steady aim for long-distance precision shots.
- One-Tap Headshot Experts: Instant headshots post; boosts reflex-based aim efficiency.
Sensitivity Settings For Snipers Specialists!
Snipers prioritise precision and long-range engagements. So they require a stable and controlled aim. For these players, lower sensitivity settings help maintain accuracy. Especially for headshots with weapons like the AWM or Parafal.
| Setting | Value | Use |
|---|---|---|
| General | 85 to 90 | Balanced for smooth, controlled movement |
| Red Dot | 80 to 85 | Stable aim for close-range fights |
| 2x Scope | 75 to 80 | Steady aim for mid-range targets |
| 4x Scope | 60 to 65 | Helps control recoil with long-range ARs |
| Sniper Scope | 30 to 40 | Precise aim for one-tap headshots |
| Free Look | 60 to 70 | Smooth camera movement for easy scouting |
Keep your crosshair at head level and use a small, bright crosshair (e.g., green) for better visibility. Test these settings in Custom Rooms to perfect your sniper aim.
How To Improve Your Playstyle Settings!
Just follow these tips if you want to test or improve your Playstyle settings:
Start in Training Mode
You can start by going to Training Mode. You should practive shooting at moving targets to check if your settings feel comfortable and accurate.
Play in Custom Rooms
Use Custom Rooms to create real match situations. This helps you improve your aim and movement in a controlled environment.
Adjust Settings Slowly
Do not change your settings too much at once. Increase or decrease each sensitivity by 5 to 10 points if your aim feels too fast or too slow.
Check Your Device Performance
For Low-budget devices (4–6GB RAM), it is advised to increase your General sensitivity. You can increase it to 95 to 100 to reduce lag.
For High-end devices (6GB+ RAM, 90–120Hz screens), you can lower sensitivity. You can do that by 5 to 10 points for smoother control.
Use High FPS Mode
Turn on High FPS or Ultra FPS in the game settings. This makes the game feel smoother and more responsive.
Turn On Aim Assist
Aim Assist helps you get easier headshots. To enable Aim Assist in PUBG Sensitivity Settings, go to Settings > Controls.
Update the Game Regularly
New updates can change how sensitivity works, so keep your game updated for the best performance.
Customise Your Crosshair
Choose a small, bright crosshair (like red or green) and keep it aimed at head level for better accuracy.
Lower Graphics on Budget Devices
If your phone heats up or lags, reduce your graphics quality. This helps maintain good performance with high sensitivity.
Best Free Fire Sensitivity Preferred By Gamers Around The World!
Sensitivity settings in Free Fire are sort of personal, and it really just depends on your device. Even the playstyle like aggressive close-range vs. precise long-range. Or whether you use a gyroscope. Based on popular recommendations from the gaming community, here are some of the most commonly shared “best” configs. These focus on headshot accuracy, no-recoil control, and smooth aiming.
| Config Name/Source | General | Red Dot | 2x Scope | 4x Scope | Sniper Scope | Free Look |
|---|---|---|---|---|---|---|
| Aggressive Headshot | 95-100 | 90-95 | 85-90 | 75-80 | 50-60 | 70-80 |
| Balanced All-Device | 85-90 | 75-80 | 65-70 | 55-60 | 40-50 | 50-60 |
| Precision Long-Range | 80-85 | 70-75 | 80-90 | 70-80 | 30-40 | 60-70 |
| High-End No-Recoil | 90-95 | 85-90 | 75-85 | 65-75 | 45-55 | 65-75 |
| Beginner Safe | 70-80 | 60-70 | 55-65 | 50-60 | 30-40 | 50-60 |
Test them in Training Island or Custom Rooms, and tweak by five to ten points for comfort. Higher values (e.g., 90-100) suit fast-paced, drag-shot styles. Lower ones (e.g., 50-70) for precision sniping. All are for non-gyroscope unless noted.
- Aggressive headshots are ideal for gamers who rush out. Also, devices with low storage, like 2-4GB RAM.
- Balanced All-devices configs are great for beginners as well as seasoned players. Devices with 4 to 6GB RAM phones.
- Precision long-range configs are best for snipers or high-DPI devices. Lower sniper sensitivity reduces recoil on XM8/MP40.
Final Thoughts
Changing your Free Fire settings to fit your style is really important. The right settings make your sensitivity better. This way, you can control the game more easily and get more accurate shots.
Many pro players try different settings to find the best sensitivity for landing one-tap headshots. If you want the best sensitivity settings for headshots in Free Fire 2025, you should adjust your general, red dot, and sniper settings to get the best aim.