Neverness to Everness Sakiri Build Guide
Sakiri stands out as one of the most engaging S-rank characters in Neverness to Everness, delivering exceptional crowd control and area-of-effect dominance that make her a top pick for wave-heavy content. If you're looking for a reliable Neverness to Everness Sakiri build guide to unlock her full potential, this comprehensive resource covers everything: her full kit, optimal playstyle, recommended Arc, awakening priorities, and team synergies. Consider this your definitive manual for turning Sakiri into a battlefield commander—no guesswork required.
NTE: Neverness to Everness
Who Is Sakiri in Neverness to Everness?
Sakiri is an S-rank Incantation Gas character who excels as a crowd-control summoner and sub-DPS. Her signature partner, the autonomous demon-hammer Kiroumaru, serves as both weapon and battlefield ally. Together, they pull, devour, and suppress enemies, creating massive damage windows for your entire team.

Sakiri truly shines in AoE scenarios—open-world mob clearing and multi-enemy challenges—where her gravity manipulation and enemy gathering allow allies to pile on damage safely. While she may not be the premier single-target boss killer, her ease of use and team-wide utility make her a staple in the global meta.
Sakiri Skills Breakdown
Understanding Sakiri’s kit is the foundation of any strong Neverness to Everness Sakiri build. Every ability revolves around Kiroumaru's unique mechanics, blending control, damage, and team support.
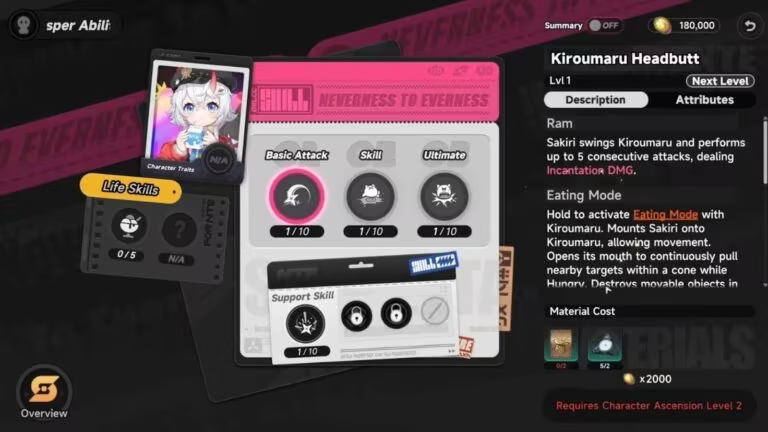
Basic Attack (Kiroumaru Headbutt / Ram)
Perform up to five consecutive swings dealing Incantation DMG.
Hold the attack button to enter Eating Mode, mounting Sakiri on Kiroumaru for increased mobility while continuously pulling nearby targets in a cone. In this mode, you can devour weakened enemies and destroy movable objects (each enemy takes 180 seconds to digest; only one can be digested at a time until capacity increases with awakenings).
Critical Riposte (Mischief)
Triggered by executing a perfect dodge during Ram. Sakiri leaps and slams Kiroumaru down, dealing AoE Incantation DMG and reducing enemy Break value.
Skill: Devour Whole
- Tap (Burp) : Kiroumaru opens wide, pulls in nearby enemies, then inflates and knocks them down—ideal for quick grouping.
- Hold (Gravity Eater) : Pulls enemies inward before biting through the ground to levitate them (ineffective against powerful foes), setting up airborne combos.
Ultimate: Feast of Gluttony
Kiroumaru rains massive Gravity Slurry from above, dealing six instances of AoE Incantation DMG. Hit enemies suffer heavy gravity suppression, pinning them to the ground and preventing movement (not effective on bosses). This creates prime windows for team burst damage.
QTE / Support Skill (Squash!)
Slam an enlarged Kiroumaru onto a target for AoE Incantation DMG.
Additional Support Effects
- Can I Eat This? (Scorch Enhancement) : Boosts DoT taken by targets in Scorch state by up to 100%.
- Impish Trick : After casting Feast of Gluttony, increases all team members' ATK (excluding Sakiri) by 30% of her base ATK for 20 seconds.
Note: All abilities deal Incantation DMG unless stated otherwise, making Sakiri a consistent elemental contributor.
Mastering Sakiri's Playstyle
Sakiri's gameplay loop is straightforward yet deeply satisfying: gather with Devour Whole, levitate enemies for bonus damage, then suppress them with Feast of Gluttony.

- Use the tap version of her skill for rapid mob pulls in chaotic fights.
- Use the hold version for airborne setups that chain seamlessly into her ultimate.
- Eating Mode adds mobility and exploration utility—ride Kiroumaru to zip across the map, collect items, and clear obstacles.
Her core strength lies in creating "damage windows" through gravity suppression and levitation, amplifying your team's output. Pair this with reactions like Covering Pattern for explosive burst potential. The result? Effortless wave clears and smooth team synergy that feels rewarding for both new and veteran players.
Best Arc Recommendation for Sakiri
For her signature weapon slot, Good Boy's Grand Adventure is the top choice in the current global meta. This Arc provides:
- Up to 25% increased Ultimate charge speed at higher refinements.
- A team-wide ATK boost of up to 12.5% for 20 seconds after using your Ultimate.
- An additional 6.25% ATK bonus if enemies are controlled.

This Arc perfectly complements Sakiri's control-heavy kit, ensuring faster Ultimate uptime and stronger team buffs during her suppression phases. Prioritizing this weapon early pays significant dividends in endgame content.
Sakiri Awakening Priority
Awakenings dramatically enhance Sakiri's control capabilities and damage output. Prioritize them in the following order for maximum impact:
- Sensory Collapse (A5) : When Devour Whole launches a target airborne, instantly refills Ultimate energy and resets its cooldown—enabling non-stop control chains.
- Wishful Reliance (A4) : After Feast of Gluttony, boosts team ATK (excluding Sakiri) by 30% of her base ATK for 20 seconds.
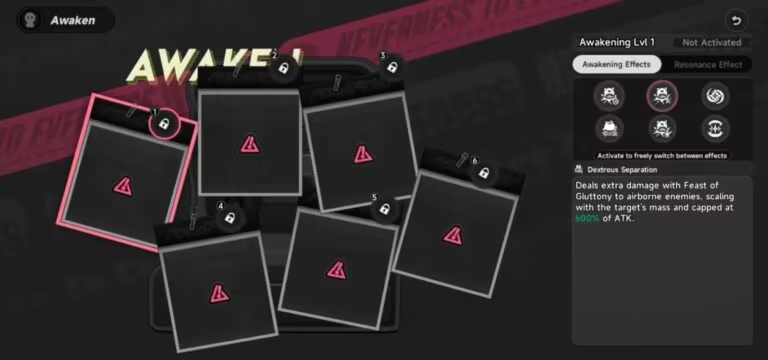
- Dextrous Separation (A2) : Feast of Gluttony deals bonus damage to airborne enemies, scaling with target mass (capped at 600% ATK).
- Diffusive Haze (A1) : Extends the immobility effect from Feast of Gluttony to 6 seconds.
- Gluttonous Dissolution (A6) : Allows Kiroumaru to devour and digest up to 3 enemies simultaneously in Eating Mode (independent timers).
- Adhesive Grip (A3) : Boosts Devour Whole and Feast of Gluttony damage by up to 60% for 15 seconds based on team-killed enemies (resets out of combat).
Additional Bonuses
- At 3+ Awakenings, unlock Insatiable Appetite (skill level +1 on key abilities).
- At 6 Awakenings, unlock Fog Penetration (3% more damage per negative effect on the target, up to 12%).
Best Sakiri Teams and Synergies
Team composition is crucial for maximizing the effectiveness of any Neverness to Everness Sakiri build. Sakiri thrives as the crowd-control core, enabling powerful elemental reactions and ensuring safe damage uptime.
Here are two recommended team setups:
| Team Composition | Key Synergies & Why It Works | Best For |
|---|---|---|
| Sakiri + Nanally + Xun + Mint | Covering Pattern (damage amp + burst) + Genesis reaction (Genesis Buds with multi-bonuses). Sakiri controls the field while allies amplify and detonate. | General content, AoE wave clears |
| Sakiri + Requiem + Nanally + Fadia | Covering Pattern + Dissonance (Break reduction) + Nova (Psychic burst) + Scorch (DoT). A versatile setup that handles both mobs and bosses efficiently. | Boss encounters & mixed scenarios |
These setups leverage Sakiri's gathering and suppression to fuel high-impact elemental reactions. Always keep Sakiri active on the field to maintain control uptime and swap in alternatives based on your roster.
Pro Tips for Sakiri
- Ultimate Timing: Save Feast of Gluttony for after a successful hold-skill airborne launch to trigger Sensory Collapse (A5) for instant resets.
- Exploration: Use Eating Mode outside of combat for faster traversal and item collection—Kiroumaru makes exploring the map both fun and efficient.
- Build Focus: Prioritize team compositions that enable reactions like Covering Pattern early on, as these multiply her utility.
- Boss Fights: Rely more on basic attacks and QTE skills, but use her pulling abilities to group summoned adds for additional AoE value.
Conclusion
This covers everything you need for the ultimate Neverness to Everness Sakiri build. With these strategies in hand, you'll have Sakiri dominating waves and supporting your team like a seasoned pro. Spend some time in lower-stakes content to perfect the gather-float-suppress combo, and you'll quickly see why she remains a fan favorite in the global version of the game.